Monday, January 6, 2014

Successful Stock Mount!

Well, it's taken us quite a few ideas and prototypes, but I think we honestly started in the wrong place trying to figure out how to affix an N-Strike Stock adapter to an LTAR.  Previous attempts had focused on utilizing the upper rear portion of the blaster (where the iOS Cradle attaches) as a mounting point for this kind of device.  While we are still pursuing ideas like that, I honestly think I've found a much better location suited for a Stock Adapter.  The battery door.

It's simple, almost too simple... but it makes a lot of sense, especially considering the trouble we've had with the top-mounted method.  When stress is applied to the part, the connections lift up and the adapter separated itself from the blaster.  A shoulder stock should be able to withstand that kind of force, so relocating the adapter to the battery door, which is rear-facing, is a solid point to mount.  The more force you push into the stock, you're really just strengthening the connection point instead.

We used Plast-aid Multipurpose Repair Plastic to weld the back of this Spectre REV-5 stock adapter to the battery door of the LTAR-AR.  It took awhile to get the right fitment and positioning of this adapter, and I may make alterations and modifications in the future of this piece based on my experience with it in future games.  The design of the N-Strike Stock Attachments means there's about a half inch lower from the adapter needed for the spring-loaded lock and release mechanism, so it's not a flawless matchup when you're holding the blaster.  It tends to dig in a little to the part of your hand where your thumb joint begins.  It's not very noticeable, but I'm curious if extended use in a game would start to make it irritating.  Next week, during our Frozen Fortress game, I'll be using the LTAR-AR equipped with various N-Strike stocks to check for comfort.

I'm very proud of this adapter and hope to continue to perfect it's design.  Once I'm able to do that, we can start to pursue creating more of these so other players can easily equip a stock to their LTAR.

The LTAR-AR will be testing it's Version 2 lens adapter, Prototype Stock Adapter, and a Prototype Weaver Rail Adapter for the top portion during the game next weekend.  All three are part of our development for accessories on the LTAR.  The Version 2 Lens Adapter simply needs some adjustment to ease installation, so we hope to have a finalized version of that available this spring.  The other two should hopefully be on-schedule to be finalized before the start of our next Summer Season of outdoor Laser Tag.

Sunday, January 5, 2014

LTAR-AR Project

Today we've got a "Mod Night" at my home in preparation for our upcoming Laser Tag game at "The Base".  My primary focus will be working on enhancements to my first LTAR-based testbed.  We've been calling the Lazer Tag Augmented Reality blaster by phonetically pronouncing it's abbreviation.  LTAR (El Tar)... which sort of sounds like "The Tar" in spanglish.  Regardless, all my custom LTX blasters had some kind of name to 'em.  The LTX DMR and LTX EF5 worked fine.  The DMR is obvious (Designated Marksman Rifle).  The EF5 was used for the name of the strongest type of Tornado classification on the Enhanced Fujita scale because it was built from a Super Soaker Tornado Strike.  Since the LTAR has a sillier name, I thought I'd get a little silly with it.  The LTAR-AR is the Laser Tag Augmented Reality - Assault Rifle.  When all is said and done, the full name sounds legit while the abbreviation sounds like "El Tar Arr" phonetically.  Yes, it's important to spend time thinking about names for these things.  Don't ask me why.  It just is.


The LTAR-AR will be just that: an Assault Rifle variant of the standard-issue LTAR.  It will utilize a combination of add-on parts, like the lens adapter that Eleri developed, a modified battery door that mounts an N-Strike Stock Adapter, and will have other devices added to it.  When completed, the LTAR-AR will be a solid rifle with great accuracy, change-on-the-fly options, and will be able to be used by any player familiar with the base LTAR's controls.  This will make it not only easier to develop (and potentially make more of) but will also mean that normal players will be able to use it without the need to brief them on it's functions.  It simply enhances the range and usability of the standard blaster.  The LTAR-AR is less of a custom blaster specifically for my use (like other blasters have been before) but ore of a step in the direction of the promotion of players in our group to seek out customizing their own blasters with these easy add-on parts.

The goal is also to promote laser tag abroad by making 3D parts available for other modders to purchase for their blasters.  As a whole, we hope this will be an easy way for folks to modify their blasters and encourage future modifications!

Friday, January 3, 2014

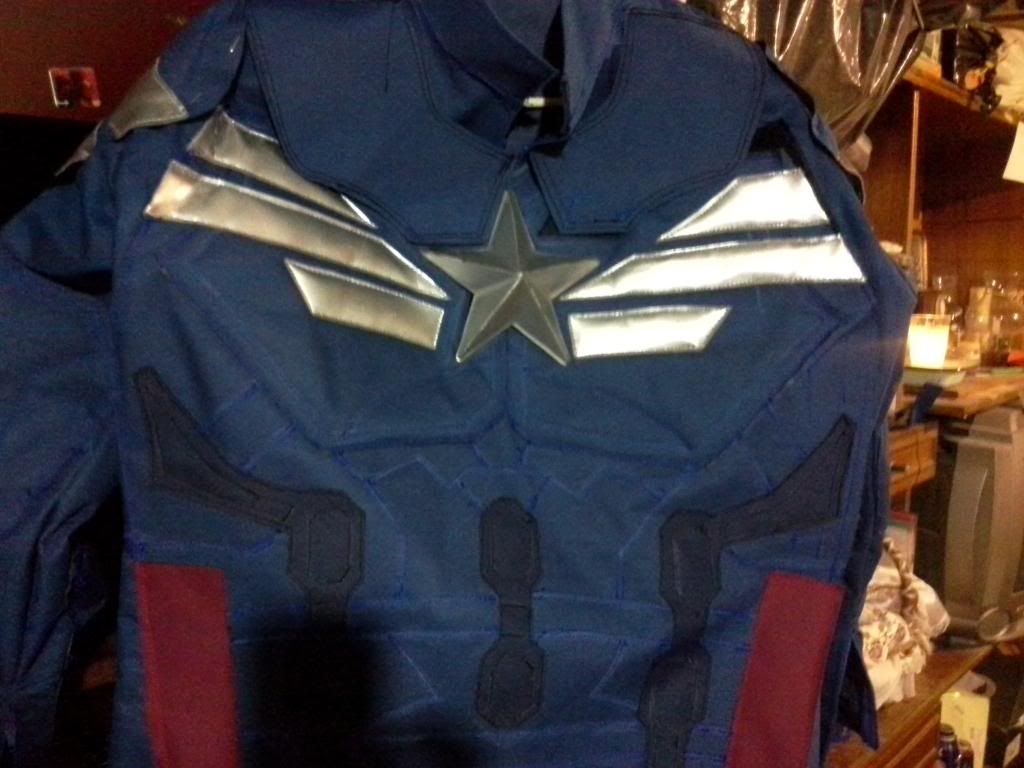
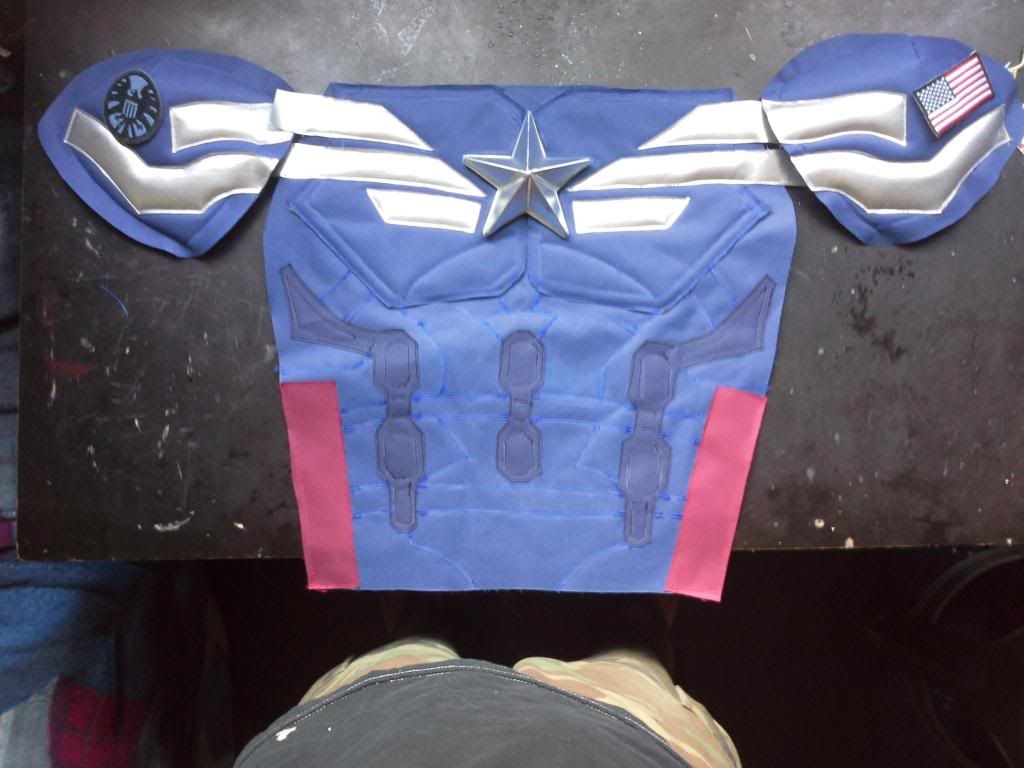
Cap: Back in Black

April 4th, 2014, Captain America: The Winter Soldier, duuuude.  Yeah, if you haven't picked up on it yet, I'm a big fan of Steve Rogers.  In 2011, I was the First Avenger for Halloween, and for our Halloween Laser Tag game.  The next year I did his Avengers variant.  Now usually I get to work on a Halloween costume in September as that holiday approaches, but when The Avengers movie came out, I wore my Captian America: The First Avenger costume to opening night and got quite a few compliments on it (as well as a few photos with fans).  It was neat feeling like a superstar and, although Captain America is using both this new S.H.I.E.L.D. issue uniform for most of the movie, he is also shown wearing his World War II era costume, too.  I could get away with just wearing my old costume again, but I'd still make this one for a couple of reasons.

The first being... well, you guys know I'm a completionist.  It'd be wrong to have just the two costumes and not bother with the third.  Also, this new costume is based off of probably my favorite comic-book variation.  Steve Rogers, when he was working for S.H.I.E.L.D. initially, had a costume almost identical to what we see in the movie trailers for The Winter Soldier.  It's not nearly as "Star Spangled" as his normal geddups and is just a little more practical.  He still uses the iconic shield to look 'Muricah enough for fans.

Also, if this is to be a costume to be used eventually for our Halloween Laser Tag game, it'll be a little more stealth than wearing a flag on my torso.  The Dark Blue/Black covers much of the uniform, the dark brown leather straps are just as dark, and the silver Stars and Stripes contrast enough to bring some "pop" to an admittedly darker setup than Cap is usually known for.

The trouble with building a costume BEFORE the movie is out is trying to find enough shots that give clues and cues as to what features this uniform has.  To the left, you can clearly see how this costume (seen in "Heroic Age" and "Super Soldier" comics) is pretty darned close to the 2014 Movie version except that the red stripe along the side of the pants has been left out.  The Star in the middle as well as the logos on his shoulders are slightly different too, but clearly based off of this version.  However, all the details in the movie version are lost in this more form-fitting spandex-esque version seen in the comics, so I'll have to rely on the screenshots from the movie to see those.

In my "Avengers" costume, I made it lightweight enough to use easily for indoor use, whereas the First Avenger version was full-on leather and quite heavy and hot to wear.  I wished I had taken more time to get as detailed with the Avengers version as I had the WW2 version, so I'm hoping this costume will find a good middleground.  While the costume preparation is mostly for the upcoming movie, I'm certainly planning ahead for our Annual Halloween Laser Tag game 10 months from now.  I'd also like to do a costume Nerf game as well, so making a costume that is indoor and outdoor friendly that won't get in my way is going to be the challenge here.  I've thought about using a Dark Blue/Navy Combat Shirt as the basis for the upper portion.  The nice part about using that is it's actual function in a laser tag or Nerf game.  Breathable, easy storage, and it's already got the "Tacti-cool" look we see in the costume.  The gloves, tactical belt, and boots I can actually reuse from the First Avenger costume (as well as the iconic shield), so it's nice to already have some items on-hand.

I've still got plenty of time before the movie, and TONS of time before Halloween, so we'll see if something significant can come together.  Who knows, maybe at an upcoming indoor or outdoor game I can test out some components of it to make sure it can hold up!

Image1, Image2, Image3

Thursday, January 2, 2014

Frozen Fortress Preparation

Happy 2014, everybody!  Time to dig in with another year of Nerf and Laser Tag here on the blog.

It's probably the COLDEST start to the New Year that I can remember (in our city) in awhile and what do I intend to do?  Go outside and play laser tag at "The Base".  Yeah, we're a little nuts, but I've been itching to play at this coveted gem of Laser Tag heaven.

To prepare for war, we've started up some long-neglected projects for Laser Tag, including our shell-swap accessories.  Got that Adapter designed by Eleri installed on an LTAR and will be working on this as a rifle platform as we continue to develop shoulder stocks for these.

At the core of the blasters for this Frozen Fortress game, we'll be running Energizer Ultimate Lithium batteries, which can operate in extreme temperatures.  Normal AA batteries won't stand up well when the temperatures dip below freezing.

The game is on Sunday the 12th, but we've got a Mod Night coming up on the 5th to prepare.  The LTAR pictured above is just one of the many blasters we're preparing for the games up at the Base.  Should be fun!

Monday, December 30, 2013

Happy Nerf Year!

Last night, a buncha friends put together a "Happy Nerf Year" indoor game that closed out 2013 in a blaze of foam-dart glory!  Lots of familiar faces with some new folks to meet, lots of blasters to choose from, and a few different gametypes that made things interesting.  We had 12 folks total (11 pictured) that played from 6pm until about 10, so it was a full night of Nerf!!

We did our basic team elimination games for a few rounds.  Upstairs vs downstairs, with a no-mans-land around the entrance of the home and a choke-point at the staircase.  I kept forgetting that the fireplace in one of the rooms actually is open to the other side, so a few folks got caught off-guard when they were tagged out through that.  The last full-house team elimination game we did ended in a bit of a landslide, as my team cleverly utilized the staircase to the basement to our advantage.  The other games were only separated by a couple of points, so it was fairly even otherwise.  We cut off the basement for the last couple of games and shortened the field of play.  Games were a little more fast paced with quicker respawns and closer-ranged combat in general made things quite interesting.

I personally started off the night with a RapidStrike CS-18, but ended up switching to a HammerShot and a Snapfire 8 with a pouch fulla darts for the rest of the evening.  In the close-quarters situations we were in, burning through ammo with a RapidStrike just wasn't working well.  Plus the flywheel lag bugged me in a couple of situations where I needed a quick trigger pull instead of waiting for those wheels to get up to speed.  The HammerShot delivered and was probably the most solid blaster I used all night.  The Snapfire 8 proved to be a good secondary when I needed to lay down more firepower.  Both were much easier to load than the clip-fed RapidStrike and seemed much more accurate, too.

One of my friends brought his two MagStrikes and I always forget about how awesome these blasters are.  For Hallway-to-hallway situations, the sheer volume of darts they can sling out in a quick second is amazingly terrifying.  The look on this guy's face reads the pure satisfaction you get after burning through that 10-round Magazine.  These blasters ended up getting used in those do-or-die situations (or when you were tired of missing with your single shots), but because they took so long to reload and pump up, they never really remained anyone's main weapon.  One MagStrike was given to each side to help even things out and it was fun to see them utilized every now and then to turn the tides in some nitty-gritty standoff situations.

If it weren't for the breakdown it had midway through the night, I think the modded Stampede would still take the cake.  It's powerful direct-plunger system with an upgraded spring and suped-up rechargeable battery pack made it almost as fearsome as the MagStrike.  We decided not to count blaster-hits, so of course he loaded up that iconic shield and made the house rules eat their words.  Around corners, if you were up against the Stampede, you were probably losing that battle real quick.

The last set of games we did, we had a bit of a competition built in.  There was a large empty room in the center of the field with a small wooden Christmas Tree cutout on a round pedestal.  The first team to knock it over with a dart would win the match.  Unlimited Respawns, the room itself was off-limits, so you had to nail the Christmas Tree at a distance of at least 20 feet.  We'd fight for position to take shots at the tree, miss, get hit, and have to run back to respawn, reload, and retry hitting that darned little tree.  It was fun trying to knock that fella over with pistols, but the last couple of games, guys would just clear out the area and then unload 18 round mags they had in their pockets and vests until it got knocked over.  I kinda liked keeping it to single shooters or small pistols, as it tested your accuracy a little more as opposed to the spray-and-pray methodology that was used to win the last few games.

Overall, GREAT night of NERF and a fantastic way to close out 2013!  We've got an outdoor Laser Tag game planned for "The Base" next week, so a lot of these guys here are stoked to join in with that game, too.  From indoor Nerf to outdoor Laser Tag, we're covering both my bases in two weekends!

Sunday, December 29, 2013

Mod Guide: Sidestrike

In preparation for a Nerf Game I'll be going to later today, I started going through blasters that were still stock to do some simple mods on them to get 'em ready.  Spring replacements, Air Restrictor removals, Voltage mods, just getting the armory ready to share with the other players.  I dove into the ZombieStrike Sidestrike and actually ended up spending more time on the video review and pictures than the mods themselves.  It was stupid-simple easy to do, and very similar to the Firestrike.  Still seemed a tad easier on this one, so I'd say if you're looking for a quick blaster to mod, the Sidestrike is yet another candidate to consider!  Video after the jump!

Saturday, December 28, 2013

Crossfire Bow Internals

So I took a peek inside my Crossfire Bow to see what all the hoopla was about.  Turns out there isn't much to this blaster.  Just a simple trigger, single plunger tube (looks to be about the size of a Firestrike), and this mess of orange that has all those lovely dart sensors built in that allow for the sequential firing.

Although it's use of Air Restrictors is identical to that of the Triad and RoughCut 2x4, there isn't any gear-driven priming like the RoughCut had... so doing a spring mod in this won't eat up the teeth in that gear system.  It's the only way to get more power out of this blaster.

I also took apart the blaster's shell, which separates into 3 colors for 6 pieces total (3 on each side).  There are small plastic clips on the inside of the blaster that can be released to detach these pieces from eachother.  This should make for some EASY repainting!

To release the clips, the blaster has to be in two separate halves.  Use a flathead screwdriver to push the clip through.  Don't force them, or else you'll risk damaging the shell.  Just use a little patience and start detaching the clips from one end and move to the other.  The Orange front portion comes out easy, but for the back shell, I suggest starting from the middle and then work your way towards the Nerf logo near the back of the blaster.